We’ve completely rebuilt the back-end pages for managing your TourVista account and virtual tours. Here’s a tour of the new design and features that you’re sure to love.
The Home Page
A slick new design awaits when you login to your TourVista account. The home page acts as a control panel for your entire account, showing your most Recent Tours and a nifty widget for quickly creating a New Tour.
Here’s a detailed video tutorial that for the Craigslist newbies that goes through each step of adding your post to the appropriate real estate section on Craigslist:
Learn more about our new Craigslist templates here and see why it’s important to include more than just plain text on your listings if you want them to stand out amongst the masses on Craigslist.
We’ve received a huge response to our new Craigslist templates that went live last week. So big in fact we’ve decided to allow ANYONE to use them — no TourVista account required.
Just go to tourvista.com/craigslist and enter your property information as demonstrated in this video:
Ya baby! Hope you enjoy!!
Not sure what the big deal is? Recently Craigslist hammered down on their real estate listing guidelines, essentially reducing all listings to plain text. No externally-hosted images. No fancy HTML formatting. More info at our blog posts here and here.
Nov 20th Update: More customizable and no TourVista account required! Visit tourvista.com/craigslist
In response to our blog post yesterday about Craigslist hammering down on images and styling , we are pleased to release the initial version of our New & Improved Craigslist Template for Real Estate!
While your competition is sprinkling in bold text and bulleted lists to their boring plain text ads, your listings will shine with TourVista’s new Craigslist design.
Here’s a video of the new templates – and if you haven’t already, setup a free account on TourVista and start using our new Craiglist template today!
Nov 14th Update: We’ve released a new & improved version of our Craigslist template! Details here
WOW! is all I have to say about this.
Craigslist is now removing all externally-hosted images and most other formatting from your real estate posts.
That is, your beautiful posts created using various Craigslist templates like TourVista’s are now stripped naked and in most cases looking very ugly.
No images. No fancy styling. No well-designed layout.
Just plain text and some minor formatting like bold and italics. Excuse me while I barf.
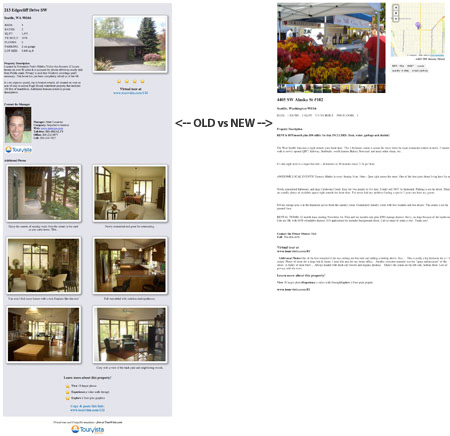
TourVista’s original Craigslist template (left) shows images and other styling. Craigslist converts it all to boring, plain text (right).
Is this just an effort to blast us all back to 1995? I don’t think so. Craigslist has always gone the route of “less is more” with their design and overall user experience. Instead, it feels more like a way to manage the look of all posts for consistency in an effort to level the playing field for everyone.
No need to freak out…
While this does have most real estate marketers in a state of shock, it is actually good news. By removing all images and fancy styling and forcing all posts to be plain text, ANYTHING that we can do to make your text better than just plain text will help it stand out.
And that’s what we are working on right now — an updated Craigslist template that takes your property info from TourVista and generates “better than plain text” copy/paste code to help it POP on Craigslist.
Stay tuned… and let us know if you have any ideas!
We’ve heard from a few users that they would prefer a more obvious way to view full size versions of the photos and floor plans on their virtual tours.
Ask and you shall receive!
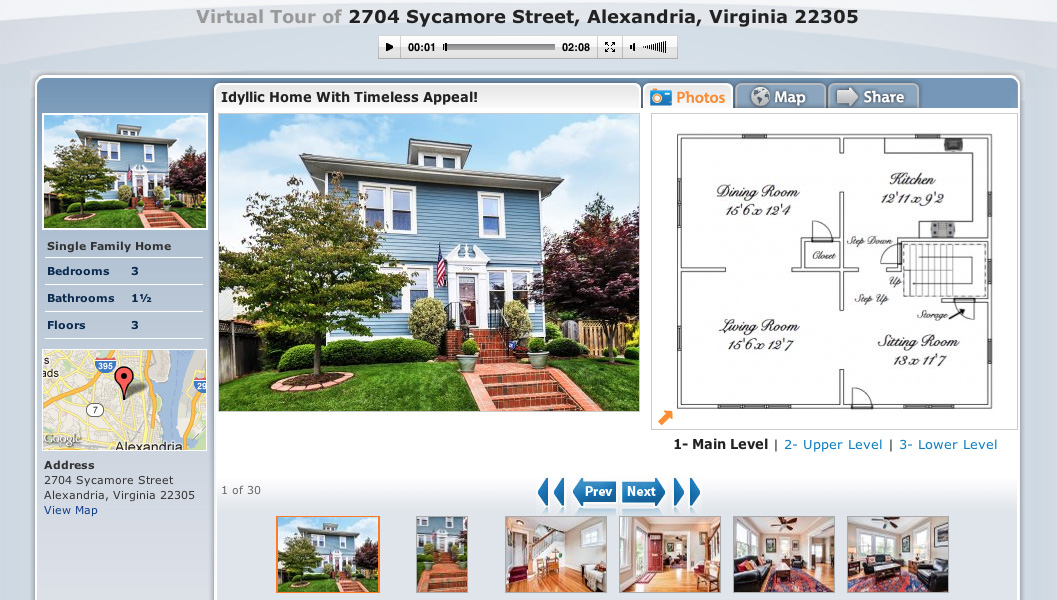
The Photos tab for an interactive floor plan.
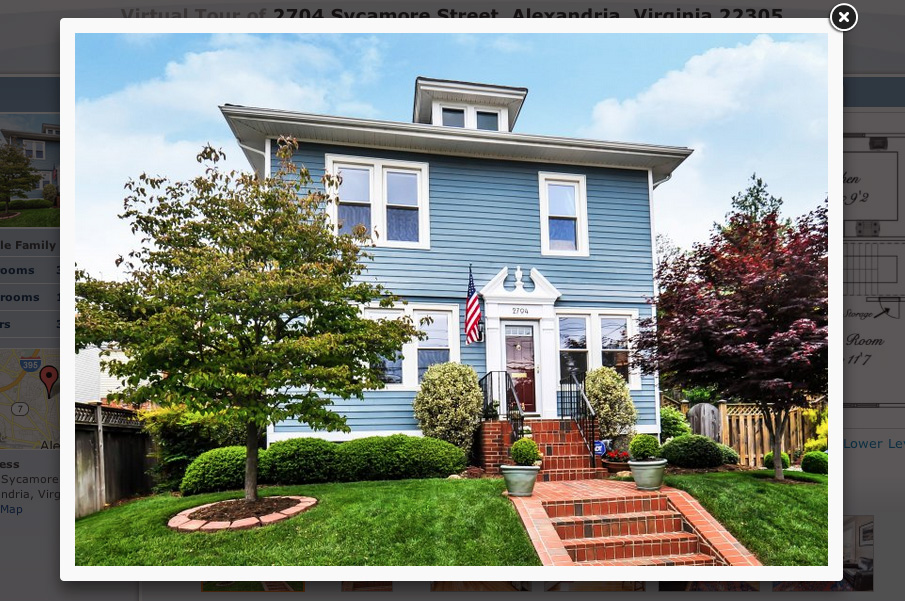
The lightbox for viewing each photo at full size.
The two screenshots above show (on the left) the Photos tab for an interactive floor plan and (on the right) the lightbox for viewing each photo at full size.
Tip: once the lightbox is showing, you can use the left/right arrow keys on your keyboard to quickly scroll through the photos.
Just visit one of your virtual tours and you’ll see that the lightbox has already been applied*.
* This update applies to Premium tours only, not free tours.
Really want to make your home stand out from all the other ordinary real estate marketing websites? TourVista’s interactive floor plans let your viewers navigate themselves through your home. Combined with photos, interactive floor plans give viewers the information they are wanting from an online tour.
Viewers of your interactive floor plan can see exactly where each photo was taken as they tour your property online. (click to view)
Interactive floor plans are especially helpful for out-of-area prospects because they may not have an opportunity to view the home in person before making a buying or renting decision. Put yourself in their shoes for a second:
You’re moving to a new city and looking for a home online. Sure, you will be visiting in a few weeks and have scheduled time with your local real estate agent to view a limited number of properties. Obviously, you want to only spend your limited time looking at homes that are a good fit for you. TourVista’s interactive floor plans provide huge value to you because you can learn so much more about a home than just viewing photos.
Your prospects have a limited amount of time when it comes to shopping for a home – there’s only so many homes a person can look at both online and in person. They have to discern which homes they can dedicate this time to…make sure they pick your home to look at online.
Many sellers and landlords make the mistake of providing too few or too little information, but this can increase the chance they’ll just skip right past these homes for fear they will be wasting their time and effort in an in-person trip. Unless this home is the least expensive in the best neighborhood – not providing enough quality pictures or video will lose you viewers and leads. These days all homes are online on this website or that one – so you will need every way you can to make a great first impression on a potential buyer/renter. Showcasing your home with TourVista gives you this edge.
Not only do interactive floor plans give you an edge online, but they also give you pre-qualified/screened customers when they schedule an in-person visit. They already have a good idea of what the home will offer them and if they are ready to take a trip there in person then you know they are interested! This will save you a lot of time in the long run.
Providing more information, like interactive floor plans, at the beginning of the home search process helps you reach out to more customers and gets them excited about your home! It also gives you hotter leads when they come visit the home in person.
So, how do you setup an interactive floor plan for your home?
It’s easy. Just create a virtual tour on TourVista, upload your photos and simple floor plan graphics and use our custom technology to “drag & drop” arrows onto your floor plan for each photo. It takes about 2 minutes to build your interactive floor plan (and it’s actually kinda fun!).
But what if I don’t already have a floor plan graphic? How do I make one?
We agree, this is the most time consuming part of creating your interactive floor plan. If you don’t already have a floor plan graphic, you’ll need to make one. Check out this tutorial which demonstrates building a floor plan using Photoshop. There are also a few websites that let you draw floor plans using your mouse. Or you can hire us and our graphic designers will turn your sketch or blueprint into a beautiful floor plan graphic that’s ready for an interactive floor plan.
Selling your home in a community ran by a Homeowners Association can be tricky. Many new home owners are unaware of the intricate rules of the association, and that each association can have their own rules and bi-laws. The property value of the home you’re selling will more than likely be increased by the fact that you belong to a HOA, from well-kept landscaping, gated area, or the like; but that increase came with a price = DUES. The value of the property might be higher, but the cost of living there is now even higher for your potential buyers because of the dues. When pricing your home for sale, take into account any dues the new home owners will have to be paying in your stead. But you can also use your HOA as a selling point, explaining that the kept lawns, safe playgrounds, and friendly neighborhood is what’s to be gained from a minimal yearly contribution.
Northbrae, Berkeley, Calif. The APA noted the views of San Francisco Bay, plus Northbrae’s “garden suburb design with streets and footpaths that follow the contour of the hills.” “In some neighborhoods, people come home and all you see is their garage door close,” Jeff Dutton, who has lived in the neighborhood 40 years, told The Daily Californian. “I take the time to talk. It’s friendly.”
Ansley Park, Atlanta. The 275-acre neighborhood was designed so no home is more than a 10-minute walk from one of the 14 parks.
College Hill, Providence, R.I. This historic neighborhood near Brown University dates to the 1600s. Preservationists saved the area from demolition in the 1950s.