Category: All

TourVista Launches Custom Websites for Apartment Communities

Many users of TourVista’s virtual tours are apartment communities. Since our inception, we have received a lot of requests from these communities for professional services, ranging from professional photography and videography, to graphic design and custom websites.

We listened.  Today we are happy to announce the addition of TourVista Apartment Community Websites to our suite of products.  In a nutshell, we:

  1. Setup and host a custom website for your apartment community, including your very own branded domain name, like www.yourname.com.
  2. Brand the website with your logo, colors, and pictures of your community.
  3. Integrate all of your TourVista virtual tours into your website’s Virtual Tours page.
  4. Setup a photo gallery, event calendar, lead generation and resident support forms, and blog, all of which are search engine optimized (SEO) to help your website rank higher in Google, Yahoo! and Bing.
  5. Hand over the keys and teach you how to update the content in-house, saving you time and money versus hiring a professional web developer every time you want to make an update.

Check out live examples of recently launched apartment community websites.

We listen to requests from our users.  In fact, we count on you to help drive the evolution of TourVista.  So don’t be shy if you have an idea that would improve your TourVista experience.  Let us know!

Here’s to a positive and productive season for marketing your properties!

Interactive floor plans are easy to setup, even if you don’t have floor plan graphics

One of the best features of TourVista is the ability to setup interactive floor plans for your properties.  Interactive floor plans consist of arrows on a floor plan graphic for each of your property photos.  Think of it as a “You are here” arrow, showing the viewers of your virtual tour exactly where each photo was taken on a map of the property floor plan.

The benefits of interactive floor plans are numerous.  Your property will stand out compared to the others that only use photos.  In addition, viewers of your virtual tour will gain much more knowledge about your property and get a much better “feel” for the layout.  More knowledge and less guesswork will increase the quality of leads that your virtual tour generates for you.


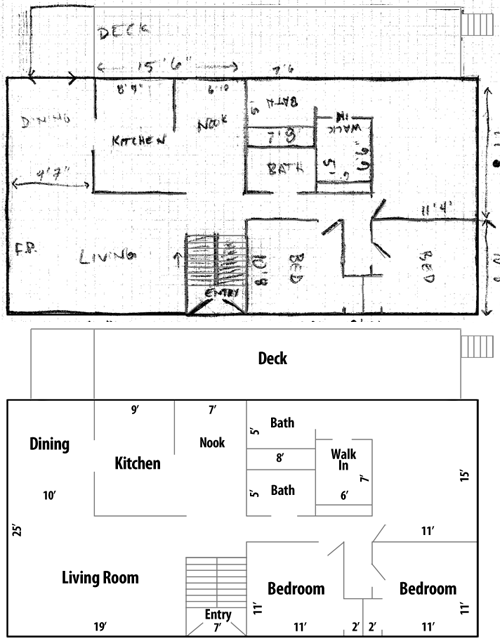
Example of a floor plan graphic created from a hand-drawn sketch
Example of a floor plan graphic by TourVista, created from a hand-drawn sketch.


TourVista makes it easy to connect your photos to a floor plan, but how do you create a floor plan graphic in the first place? We’ve outlined a step-by-step tutorial for creating floor plan graphics from your sketches using Photoshop.  If you don’t have Photoshop (or you own Photoshop but don’t have the time / skills to do it yourself), TourVista is now offering a service for converting your hand drawn floor plan sketches into graphics.

To get started, we just need a scan or digital photo of your floor plan sketches.  A digital photo of the home blueprint works, too.  The final floor plan graphic is similar in quality and design to the example shown on this post.  If you include room dimensions, we’ll be sure to add those to your graphics (rounded to the nearest foot).

We’ll send you the finished floor plan graphic as a .gif file and also the master Photoshop .psd file.  Allow 48 hours from the time we receive your floor plan sketches/photos.  You are then able to connect your photos to the floor plan like this tutorial demonstrates.

The price for converting your floor plan sketch or digital photo into a graphic is $50 per graphic.  For example, a two story home would cost $100 and floor plan graphics would be created for both floors.  We accept advance payment via PayPal or credit card.

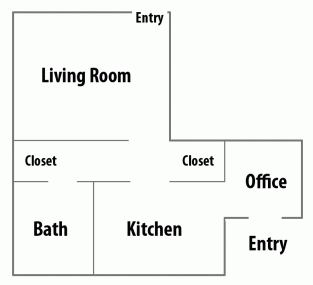
Example of a floor plan graphic created from a hand-drawn sketch. View the virtual tour with interactive floor plan.
Example of a floor plan graphic created from a hand-drawn sketch.
Floor Plan Graphic
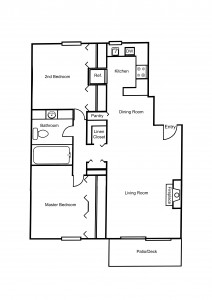
Another example of a floor plan


Give our floor plan creation service a shot for one of your virtual tours and we’re sure that you will see the benefits of a better virtual tour and receive higher quality leads.

#11 – Link to your Facebook and Twitter pages from your virtual tours

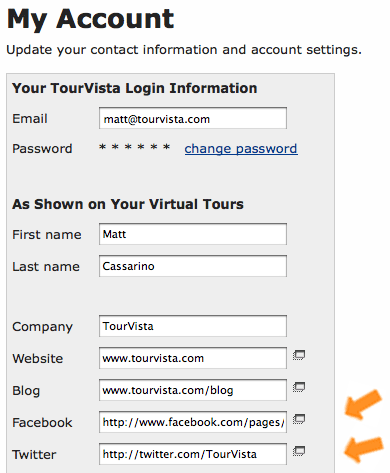
It’s easy to link your virtual tours on TourVista to your Facebook and Twitter pages.  Just copy/paste the URL (web page address) for your Facebook and Twitter pages into the form on My Account when logged into TourVista.

Connect your virtual tours to your accounts on Facebook and Twitter

By doing so, your viewers will be able to connect with you in new ways.  Thanks to our friends at www.zaran.com for suggesting this latest improvement to TourVista.

#10 – Showing your email address on your virtual tours

Recently a TourVista member requested that his email address be shown with the other contact information on his virtual tours.  This would allow his potential customers to email him directly with one click.  That makes good sense.

We take our member’s suggestions to heart and are pleased to announce the release of this new functionality for TourVista.  Now you have the option to display your email address as a link on your virtual tours.  The email address shown will be the same email you use to login to your TourVista account.

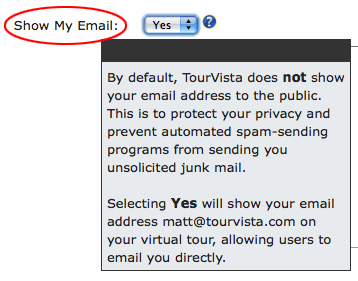
It’s easy to turn this on/off for each of your virtual tours.  Just select “Yes” from the “Show My Email” option when managing the Property Details for your virtual tours, like this:

field for toggling if your email address shows publicly

And here’s how your email address will be shown on your virtual tour:

showing your email address on a virtual tour

Of course, your potential customers can simply complete the More Information form that shows on all of your virtual tours, which will email you directly while keeping your email address private.

Take note: by publishing your email address, you are increasing the chances that automated spam-sending programs may obtain your email address and send unsolicited emails.

#9 Drag and drop photo reordering now working in Internet Explorer

An annoying website bug was squashed today: the ability to drag and drop property photos in Internet Explorer web browser.

This is a great (and fun!) feature of TourVista.  No need to mess with annoying up/down arrows to put your photos in the perfect order.  Just click on a photo with your mouse, drag it to the proper order relative to the other photos, and drop it into place!  Piece of cake.  The other photos will automatically rearrange themselves, too.

Watch a video demo of sorting photos via drag and drop (jump to 1:15 in the video).

#8 IE bug fixed on custom tour links page (MLS compliant virtual tour links)

It was recently brought to our attention that the custom virtual tour links was not working for Internet Explorer (IE) web browsers. Ah yes, IE, the nemesis of all web developers. 😉 We’ve fixed this. Sorry for the hassle for any of you IE users that experienced this bug when building MLS-compliant links for your virtual tours.

In case you are wondering how to use this nifty feature, watch this 1 minute video tutorial on creating a non-branded / MLS-compliant link for your virtual tour.

Posting your property virtual tour to Craigslist in 3 minutes (or less!)

Nov 20th Update: More customizable and no TourVista account required! Visit tourvista.com/craigslist

TourVista provides a free copy and paste Craigslist template to quickly post your property onto the world’s most popular real estate rental site. Your property will stand out with our 6 professionally designed templates, and you will save a ton of time when creating your post on Craigslist.

Here is a video tutorial for posting your TourVista virtual tour onto Craigslist:

#7: Creating floor plans from sketches in Photoshop

TourVista’s interactive floor plans are a great addition to your virtual tour.  If you already have floor plan graphics, you are ready to connect them to your photos and create interactive floor plans.

But how do you create the floor plan graphic in the first place?

You may be able to get floor plan graphics from an assessor or your home blueprints (if you can find them). Or you could just do it the old fashioned way: with a pencil and some graph paper!

Drawing a sketch of your floor plans and converting that sketch into a floor plan graphic is a fast and easy way to create your floor plans.  Here’s a tutorial on how to convert your sketches into floor plan graphics using Photoshop.

The video above follows these steps for creating a floor plan graphic from your hand-drawn sketches using Photoshop:

  1. take a picture of the sketch from straight above
  2. open picture in Photoshop and crop it; leave a small padding for the borders and dimensions should be at least 500px. if long and narrow, consider rotating it 90 degrees
  3. add guides for each wall
  4. draw exterior & interior walls on their own layers. hold “shift” key and click away
  5. add room name labels
  6. export for web as .gif
  7. save .psd for future reference
  8. upload floor plan graphic to your virtual tour on www.TourVista.com

Walls

  • color: #777777 (gray)
  • pencil width: 5px for exterior; 3px for interior

Room Labels

  • Myriad Pro – Bold Condensed
  • color: #000000 (black)
  • Size: 18-36pt

Note: when uploaded to TourVista the floor plan will be shrunk to around 350px wide.

#6: Post your virtual tours to Facebook, Twitter, LinkedIn, MySpace (and 50+ more sites!)

Leverage the power of Facebook, Twitter and over 50 other social networks to help spread the word about your virtual tours. It is super easy to do and a great way to share & promote your real estate listings using the web’s hottest new technologies.

Instructions: Post your virtual tour on Facebook

  1. open your dedicated property website in any web browser (e.g. www.tourvista.com/784)
  2. click on the Share tab
  3. mouseover the “Social networks and bookmarking sites” button and click on Facebook

Facebook will open in a new window and pre-populate a Profile post for your Wall that includes:

  • a link to your virtual tour website
  • the property address, type and description
  • a thumbnail image – select a different image using the little arrow buttons

Add a personal note at the top if you’d like and click the Share button to update your Wall and your friend’s News Feeds.

Note: you have the option of “Send a Message” that will email your TourVista link to select friends directly from Facebook. We recommend using the Wall method described above because it allows visibility to all of your friends (present and future) and will generate more traffic for you.  In this sense, the Wall post is less invasive on your friends and more permanent for your online marketing.

ps – speaking of Facebook, if you haven’t claimed your personal Facebook URL yet (e.g. www.facebook.com/mattcass) do it now – www.facebook.com/username. You can get one for your company page on Facebook but only if you have 25 fans. Of course, we’d love to have you become a fan of TourVista’s Facebook page!

update 12/21/09: link to your Facebook and Twitter accounts directly from your virtual tours!

#5: How to setup MLS-compliant links to your virtual tours (non-branded)

TourVista creates a dedicated property website and link for each of your virtual tours. For example, www.tourvista.com/784. Link to this dedicated property website in your marketing materials to maximize your property views and increase your online brand.

Property sellers: be sure to include your TourVista link in your local MLS and get maximum exposure for your property. Most MLS’s will include this link in their data feed, meaning that your virtual tour link will show on many major real estate search portals.

Some MLS’s restrict the information that you can show online about your properties. TourVista allows you to customize which information is shown ensuring that you are in compliance with your MLS.

This short video gives a demonstration on how to create a non-branded, MLS-compliant link to your virtual tour website: